Showing posts with label tin ceilings. Show all posts

Thursday, January 24, 2013

Shockingly, progress continues

The house does tend to get angry about large projects, and this time it vented its spleen by having the dishwasher spring a leak - soaking the joist below, a bit of the floor, and half of the island back.  The joist and the floor should dry without damage, but the island back is mdf and will need to be replaced before it molds.  I'll tackle that next week.  It looks like the water supply line just worked itself loose; has that happened to anyone else?  Dad?

But, there was a lot of positive progress, even though some of it was expensive.  The electrician came to center the light fixture box, leaving us with one junction box that I think we can easily disguise and a trustworthy attachment for the new ceiling fan (which should be arriving soon).  We booked a mason to fix the chimney as he was very reasonable in price and could do the work today (I think he was so reasonable because he was grateful to get a last minute job that he could do even though it's freezing since it was inside!) 

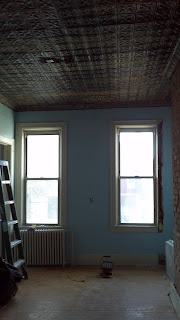
It also turns out Jaimee is much better at sanding joint compound than I am.  And applying it, really.  Thank heavens.  Because of her hard work, the walls were ready to be painted as soon as the ceiling was sealed.  I tackled the sealing with satin polyurethane, and Jaimee started painting once the sanding was complete.  The ceiling is sealed and the walls have their first coat!


It's hard to easily see the color, but this room is sort of a sky blue.  Tonight we'll will tackle the second coat - and begin the extensive cleaning required to get rid of all the demo dirt.  Weirdly, I find the cleaning much more fun than the sanding.  Or perhaps that's not weird at all - after all, you can see progress when cleaning!
Monday, January 21, 2013

Sometimes painting a ceiling ends in ripping it down

Or does that really only happen in my world?

R2 officially moved out yesterday, and she was so very efficient in the process that she was moved in, we helped her unpack and setup the kitchen, and we were still home by 2:30.  With a whole afternoon free, we decided to dive into the painting, starting with the ceiling (of course.  I learn.).

Once the first coat was up, I mentioned that I wanted to remove two cabinets that were residual from the room's original purpose as a kitchen.  Jaimee dove right into the demo.  When the cabinets were out though, guess what we saw?


Yeah.  Tin.  Above a drop ceiling.  Beautiful tin.  But - why was the ceiling dropped?  Is the tin just too messy?  Best check it out - 

It looks great - solid and beautiful.  Better than the tin in the kitchen!  We paused for discussion - do we do the exhausting demo and painting work that would be involved to expose it?  Or do we just close it up and leave it?  Now - many many posts ago when I removed the first set of cabinets in that room to make it a better space for Erin, we did discover that the ceiling was dropped.  We didn't explore it much then though, as the small area of ceiling exposed there was the *only* part of the ceiling that was battered, holy, and not patterned tin!  We just closed it up.  But now...we see so much lovely tile...

 And Jaimee loves the demo...

So we tore the ceiling down.  The ceiling that we had just painted.  By the end of the night, the entire drop ceiling was down, and Jaimee had started knocking off the loose paint.  Side benefit to this - the ugly florescent fixture that was in that room is now gone!  And oddly there were two more florescent fixtures hiding under the dropped ceiling.  They were only connected to each other, not to a power source.  I guess they change directions after hanging them - but why they weren't removed is beyond me...

Jaimee has the day off today and will continue removing paint.  Stay tuned for the next exciting installment!